Showing posts with label outdoors. Show all posts

Wednesday, August 19, 2015

Exterior Update with Vinyl Siding


Today I am sharing with you a recent update we completed on the exterior of our home. When we purchased our house three years ago, we knew the front of the house would eventually need to be repainted and we had planned to replace some of the wood siding. We put it off for quite a while, but it became obvious this Spring that the time had come to give the exterior a little update.

We decided to cover the wood with vinyl siding to update the house and avoid repainting in a few years. Since the back and sides of the house already had aluminum siding, we decided to keep them and only side the front of the house. 


The process began with power washing the whole front of the house and removing the shutters and light fixtures. In the process, we uncovered that beautiful black paint that used to cover or home. 


Next, J channels were placed to outline the sides, doors, and windows. 


Once the J channels were in place, Starter strips were used at the garage area and placed at the very bottom of siding. Then, we were able to begin the siding nailing in the siding every 4-5 inches. 

Where the siding meets the gutters, we used finishing strips to finish it off and a snap lock punch too  was used to create lugs (see image below)


Finally, we oohed and ahhed the results with drinks in hand.


What do you think?! Do you love it as much as we do?


Happy Hump Day!


Friday, July 24, 2015

Garage Door Makeover


This summer, Adam and I decided to tackle the outside of our house. We gave the pre-existing siding a color change, added vinyl siding, purchased new lighting, and put a fresh coat of paint on all the doors. Once the garage door got a fresh coat of paint, I was finally able to put up the brackets I bough two years ago for the garage door. 


Here is the BEFORE picture:


And these are the AFTER pictures:


It makes a world of difference to the exterior of the house, took less than a half hour and only cost $10.

Happy Friday!


Tuesday, June 16, 2015

Mason Jar Lanterns


I have really been enjoying decorating our backyard this year, and I decided it's time to show you what we've been up to, starting with these DIY Mason Jar Lanterns. 

I saw these adorable Outdoor Tuna Can Lanterns from In My Own Style and knew I wanted to recreate them. I showed them to Adam, and in the matter of an afternoon, he had them complete! I decided on Rustoleum Oil Rubbed Bronze spray paint (the same color I used to paint my ceiling fans) and instead of hurricane vases, I used mason jars. I stuck some citronella candles in them to finish the project off.

 Diane has posted a great tutorial for making these lanterns HERE.


I love these mason jar lanterns because they look great, but also because they help light the patio and keep the bugs away. Win, win... win!

Happy Wednesday!


Thursday, May 21, 2015

DIY Outdoor Pallet Bar


Warmer weather is upon us, and I am loving spending my weekends and evenings outdoors. We love to entertain in our backyard on warm summer days. This year, we decided we needed a space to place food and beverages while we are outside, so we decided to make a bar.

Adam gets free pallets from work, so we chose to make our bar out of wood pallets. We spray painted two pallets, screwed the together, and added a scrap piece of wood to the top. I decided to paint the top with chalk paint to write fun thing or to label specialty drinks. 


It was a pretty simple project, but I love the final result!

Are you working on outdoor projects for summer?
We are definitely looking forward to a few outdoor updates and many days full of BBQ's and corn-hole tournaments.


Wednesday, December 3, 2014

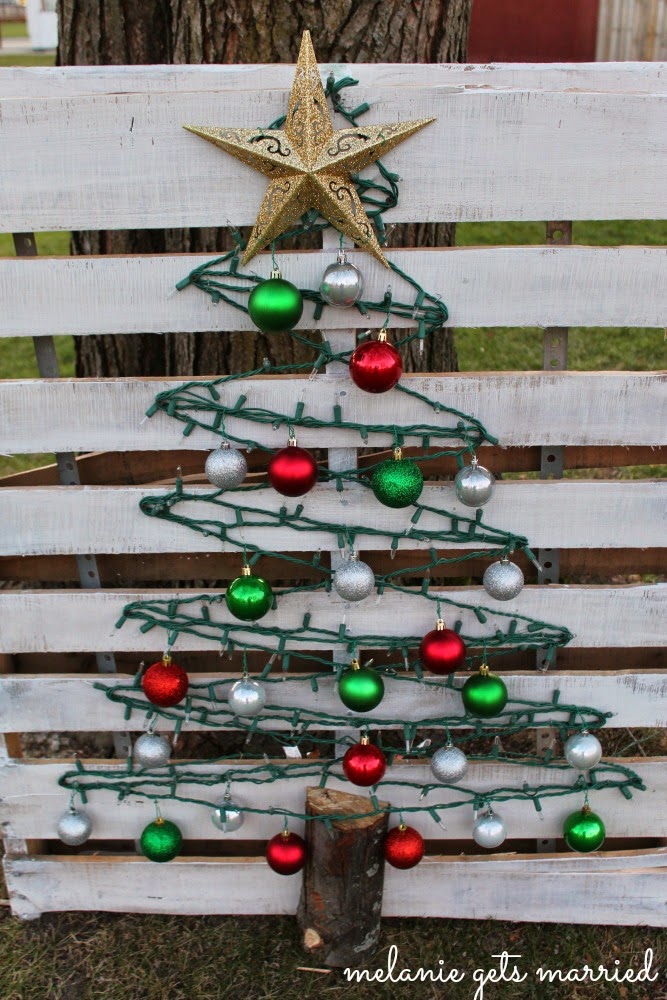
Wood Pallet Christmas Tree


Good Wednesday Morning everyone! Thanksgiving came and went and I am now up to my ears in Christmas ornaments, scattering them throughout the house in every bowl, vase, and lantern I can get my hands on. Tis the season, right?!

In the midst of all my indoor decorating, my husband stayed outside stringing the lights around each door and window. And when he finished that, he moved on to a new lawn ornament for the holidays. Adam has been wanting to do a pallet project for months now, and we finally decided on something we would both enjoy... a wood pallet Christmas tree. And we made it for a whopping $4! Inexpensive projects are truly my favorite ones!

Our inspiration came from Julie at Redhead Can Decorate, check out her post here. 


Adam used a towel to brush on some white paint, making sure it looked a little weathered. Then, he stapled some Christmas lights onto in the shape of a tree and added a stump of wood as the trunk. Once that was finished, he put it up outside using to stakes and simply slid the pallet onto the stakes.


I got to do the fun part... the decorating! :)
The ornaments and star were purchased at the Dollar Tree.
I used ornament hooks to hang them onto the tree and made sure to twist the hooks so the ornaments wouldn't fall off. I also used ornament hooks to attach the star.  


It's so cute I almost didn't want to leave it outside!

Do you decorate the outside of your home with Christmas lights?
We are one of only two houses around us that have lights up and it makes me sad. 


Friday, September 5, 2014

Garden Update Part Two: 2014


Ladies and gentlemen, we have vegetables! Lots and lots and lots of vegetables!

The past few weeks, our garden has been giving us so many delicious fresh veggies, and we couldn't be more excited about it! At the beginning of August, we decided the tomato plants were getting too tall and the cages weren't able to support their height. A good problem to have, but still we needed a fix. We got creative with supplies we had on hand and ended up using zip ties to tie the to tall posts in the center of the plants.

Remember when I said I was excited for a salsa garden? Well, a salsa garden I got! I whipped up three batches of salsa last week, and I am planing to make even more this weekend. 


Not too much difference in August, at least not much that you can see from a distant picture. But if you look closer, there is a whole lot of growing going on in there.


It seemed to take forever for our tomatoes to redden, but now that they have, we have tomatoes growing out of our ears!


Our cucumbers are also doing great! One day I was saying how sad I was that none were growing, and then all of a sudden 8 were ready to pick. We have not been able to keep up with the cucumbers at all. For a while, every time we ate one, we picked two more!


Our peppers are also doing really well, but I decided I may need to double the green pepper plants for next year. We have had a decent amount of them, I just feel like if we have more, we would definitely eat them right up. 


We also planted red onions, and they grew, but they are very tiny. I just purchased them at a nursery and transferred them to the ground, but I am thinking they just didn't have enough room to grow. I haven't decided if I will plant onions again, but if I do I will be sure to spread them out. 


As our first garden, we are very pleasantly surprised with how well everything grew! 
We will most definitely be planting another vegetable garden next year!

How are your gardens doing?
Does anyone else have vegetables coming out their ears? 


Thursday, August 7, 2014

How To Hang a Hammock and My New Happy Place


Welcome to my new happy place, my backyard hammock! 

When we moved in to our house, I always thought those three trees in a row would be the perfect place to hang a hammock. This summer, we finally made it happen. We found this rope hammock at Lowe's. It was an $80 hammock, but we managed to get it for $40. Score! 

Our hammock came with the supplies to hang it, but we did need to purchase some extra chain since our trees were so far apart. The hanging process was much easier than I had anticipated. We drilled a hole into the tree and twisted the eye bolts into the tree with the hooks attached. The hardest part has been figuring out how much chain to put on each side. We need that perfect balance so it is not too high, but also not so low our bums skim the grass when we lay on it, but I think we've finally found it.


I love curling up on this hammock with a good book (or good drink) in hand. It has even been a good place for cuddling with my man. It's just so peaceful out there.