Sunday, October 27, 2013

Halloween Puppy Chow


Halloween is just a few days away, and now that I'm too old to run around the neighborhood trick-or-treating, I like to spend my Halloween night watching Hocus Pocus, snacking on junk food, and anxiously awaiting the youngsters to come-a-ringing. This year, I decided to make a Halloween-themed puppy chow to munch on while hanging out with the Sanderson Sisters.

Here is the recipe in case you decide to whip some up in the next few days, or any time this fall!

INGREDIENTS:
9 cups of Chex cereal
2 cups of powdered sugar
1/2 cup of peanut butter
1 1/2 cups of semi-sweet chocolate chips
Candy Corn
M&Ms

DIRECTIONS:
1. Melt chocolate chips in a saucepan over low heat, stirring constantly.
2. Add peanut butter to melted chocolate and mix together until smooth
3. Pour the Chex cereal into a large bowl
4. Remove chocolate and peanut butter from heat and pour over cereal. Mix until the cereal is completely coated with chocolate.
5. Put the chocolate covered cereal into a large ziplock bag and pour in the powdered sugar.
6. Shake the bag until all the cereal is coated in powedered sugar.
7. Mix in candy corn and m&m's to your liking


What are your big plans for Halloween?
Anyone else planning to curl up on the couch watching Hocus Pocus?


Thursday, October 24, 2013

Etsy Shop Feature!


I am very excited to announce that my Etsy shop, Melanie's Marketplace is being featured on Ladybug Blessings today! A huge thank you to Kristen for the wonderful opportunity! Head on over to her blog to view my interview with her. 


AND don't forget to check out Melanie's Marketplace on Etsy and Like it on Facebook!


Sunday, October 20, 2013

My First Ever 5K!


Sorry to interrupt the usual crafts and recipes, but I am so excited to say that I finally ran my first 5K! 
I always think about and/or plan to run a 5K, and then for some reason it never ends up happening. I forget to register, my running partner get injured, you know, life happens. Well, I finally convinced my sister to run with me, only because she got a t-shirt and lunch afterwards!
Going into it, I only had one goal, to RUN the whole thing WITHOUT WALKING! I was pretty confident that I could do it, and I honestly didn't care how slow my time ended up being. I just wanted to run the entire 5K without taking walking breaks. 

GUESS WHAT?! I DID IT, or should I say WE DID IT! 
I ran the whole thing with my sister, who needed a little more motivation than I did to just keep running.
She did great though, and I was so proud of her at the end!


I ended up crossing the finish line at 38:16 and decided that was a great time to try to beat for my next race!


Now that I ran my first 5K, I can't wait to run another and another and another! Maybe I'll even bump it up to a 10K sometime. Overall, I had a great time running with my sister! It was a great bonding experience, and I loved having someone to talk to during my run. But, I think it was probably her one and only. I asked her when she wanted to sign up for another and she made it clear she only ran it to cross it off her bucket list. If you know my sister, this probably does not surprise you.

So, now I'm on a mission to get my hubby back in shape after his knee surgery so he can be my running partner again. I think I'm officially addicted! 


Saturday, October 19, 2013

Wooden Pumpkins


I have been seriously off my crafting game lately! School, and life in general is getting busier every day and I'm sad to say crafting has moved down on the priority totem pole. Well, this weekend I needed a break from all the school work, so I sent hubby outside to cut some 2x4's that I could make into pumpkins. 

what you'll need:
2x4 piece of wood, paint (i used orange and brown), sand paper, scrapbook paper, mod podge, hot glue gun, ribbons/wire or whatever you would like to decorate the stem

FIRST: Cut the wood.
Tall Pumpkin- 7- 8inch pieces
Short Pumpkin- 5-10in pieces
For each pumpkin, 2 pieces of wood should have 30 degree cuts on each side. These pieces will be the top and bottom pieces of your pumpkin and will make the pretty curve that gives it a rounder look.


SECOND: Paint the wood, mostly just around the edges. I started painting the whole thing, and then realized when I was almost done that nobody was going to see the tops and bottoms once I glued them together. Oops!


THIRD: Sand the edges of each piece to give your pumpkins a weathered look.

FOURTH: Apply scrapbook paper of your choosing to the front of each piece of wood using mod podge. This process is similar to making wood block letters.

FIFTH: Hot glue all the pieces together and decorate your stem!


Happy Crafting!


Sunday, October 13, 2013

Chunky Applesauce


I have another apple recipe for you today! Back when we received the whole basket of apples from a friend, I made a few batches of this chunky applesauce. It is SO simple to make in the crockpot and I love the scents it spreads throughout the house. And, it doesn't taste too bad either!


INGREDIENTS
8-10 apples, peeled and cut into chunks
1/2 cup of water
1 tsp of cinnamon
3/4 cups of sugar

DIRECTIONS
Put all the ingredients in the crockpot and cover. 
Cook on low: 8-10 hours
OR
Cook on high: 3-4 hours


I hope you enjoy this recipe as much as we do in this household!
If you decide to make it, I'd love to hear what you think of it.


Wednesday, October 9, 2013

Delicious Apple Pie


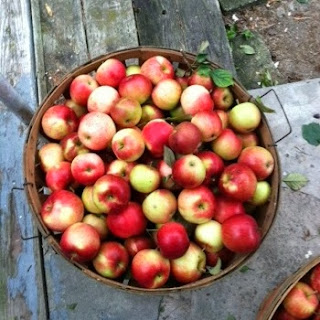
Let me just preface this by saying I have never made a pie in my life. A friend called us up one day asking if we would like some apples, and of course I said yes. Well, what we got was more than just some apples, it was a whole basket full. I have spent the past few days peeling more apples than I ever want to peel again, but the delicious apple recipes are totally worth it. My hubs requested an apple pie, so I figured I better make him one.


INGREDIENTS
Pie Crusts (homemade, refrigerated, or frozen)
6 cups thinly sliced peeled apples
3/4 cup sugar
2 tablespoons flour
3/4 teaspoon ground cinnamon
1/4 teaspoon salt
1/8 teaspoon ground nutmeg
1 tablespoon lemon juice


DIRECTIONS
1. Preheat oven to 425 degrees. Place one pie crust in an ungreased glass pie plate and press firmly against the sides and bottom.

2.  Mix all filling ingredients in a large bowl and spoon into the crust-lined pie plate. Place the second crust on top and wrap excess crust under the bottom crust edge, pressing edges together to seal. Cut slits into the top crust.

3. Bake 40-45 minutes or until apples are tender and crust is golden brown. Cover the edges of the crust with foil after 15 or 20 minutes of baking. This will prevent excessive browning. Cool on a cooling rack for at least 2 hours before serving.


Enjoy!

Tuesday, October 8, 2013

Simple Fall Vignette


Today I present to you my simple fall vignette! 
Now that it is October, I decided I better show this off in case I end up changing it up for Halloween.
I am a little ashamed to admit that I made none of this, except the paper garland hanging on the mirror. Homemade or not, I still love the way it turned out. 

letter m: tj maxx, printable: eighteen25, pumpkin: pier1imports, candle and candle stand: yankee candle, fall flowers: tjmaxx


I love these two personal Fall photos that are perfect for setting out this time of year. The one of Adam and I is one of our engagement photos from 2011. The other picture is from Lucy's puppy days. Last year, we raked our whole front yard and let Lucy run around in the pile of leaves. I very quickly snapped that picture and plan to treasure it forever, best puppy picture ever.


What do you think of the paper garland? 
I can't decide if my house can pull it off or not. 

Happy Tuesday!


Thursday, October 3, 2013

Glitter Pumpkins


I loooove pumpkins, and I love when it is finally appropriate to have them around the house. I found these pumpkins, along with some autumn colored glitter at Joanna, and decided I just had to make some glitter covered pumpkins! 

This was a pretty simple project, although my kitchen floor and doggie were both covered in glitter be the end of it. I just Covered the pumpkins with glue and let it dry for about 1 minute and sprinkled glitter all over the pumpkins until they were covered. I let them dry overnight before putting them on my coffee table. 


Now that they are finished, I just have one little problem. My dog thinks they are her balls and she tries to grab them to play. 

Also, I can't decide if I should spray the with a clear sealer to keep the glitter from rubbing off. Any suggestions? 

Happy First Full Day of Fall, the best season of all!!


Tuesday, October 1, 2013

Homemade Apple Cinnamon Dog Treats

As October is quickly approaching, I think it's only fair that our fur babies should be able to enjoy the scents and tastes of Fall, too!  I whipped up some of these homemade apple cinnamon dog treats this weekend and Lucy is just loving them! These are pretty simple to make, so go ahead, get your Betty Crocker on and spoil your favorite four-legged friends this season! 

INGREDIENTS
1 large apple
1/4 cup of honey
1/2 cup of water
1/2 teaspoon of cinnamon
1 cup of oatmeal
1 1/2 cups flour


DIRECTIONS
1. Preheat oven to 350 degrees

2. Peel, core, slice, and mince the apple. (I just made sure to chop the apple very finely)

2. Combine the apple, honey, water, cinnamon, and oatmeal in a large bowl

3. Gradually add in the flour

4. Roll dough out until it is about 1/4" thick. Use a cookie cutter to cut out desired shapes and sizes.

5. Bake for 20-25 minutes. Let cool before feeding to your precious pooch!


I have a feeling I will be making multiple batches of these this Fall! 

So now the big question is: If I make homemade dog treats, does that make me a crazy person?
I like to think it makes me a money saver...