Showing posts with label halloween. Show all posts

Monday, October 27, 2014

Fabric Covered Halloween Wreath


Another month, another wreath! 
I'm noticing all my wreaths are starting to look the same. Ribbon or fabric wrapped around a wreath form with flowers or a bow off to one side. The thing is, I just can't seem to stop making them. They are quick, easy, and always turn out awesome! At this rate, I am making a new wreath every month, and that is perfectly fine with me.

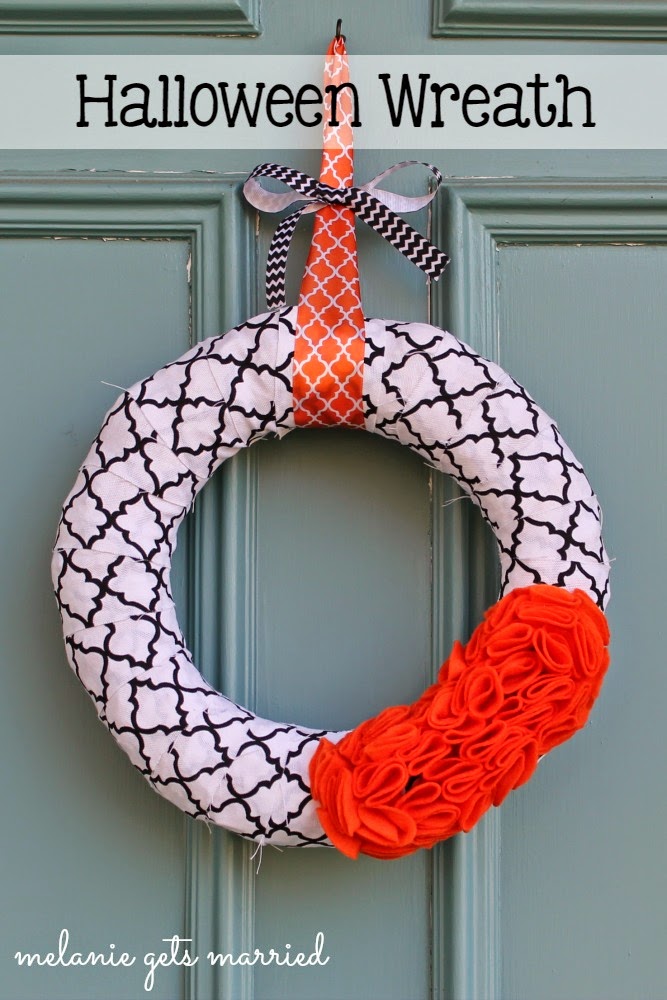
Whenever I see cute fabric, I think one of two things "this would be GREAT for a wreath!" or "this would be great for some pillows!" I have been eyeing this black and white fabric for a while and I thought it would be perfect with some orange flowers for a Halloween wreath (and even bought an extra just in case I want to make some pillows).


Perhaps I'll try to switch things up a bit for my next wreath, but for now I hope you enjoyed this one!

Happy Monday Morning!


Monday, October 6, 2014

Halloween Camping: A Tradition Seven Years In The Making


This past weekend, we headed to Metamora, Michigan for the annual Halloween Camping Trip. It is by far my favorite camping trip every single year. Every year, we seem to recruit more campers and we always have day visitors on Saturday as well. They have trick-or-treating on Saturday night, and all the campsites are usually decked out in Halloween decor.

Our theme this year was a haunted tailgate/football game. 


It was the ghosts(Eastern) versus the skeletons (Central), and since Adam was in charge of making the score board, CMU won. We were all decked out in our CMU gear. Adam's mom had bought their dog a "rufferee" costume, and we searched everywhere for a CMU jersey for Lucy to wear but had no success. Finally on Tuesday night, I thought to myself, "why can't I just crochet her a sweater?" So that is what I did. 


Didn't it turn out great!? The whole time I was making it, I had my  doubts that I could actually pull it off. When I finished it Thursday night, I was so excited that it actually fit her!

As I said before, Halloween camping is something we do every year. Adam has grown up going on this camping trip every year, and when we started dating seven years ago, I joined in on the fun. We have had gorgeous fall weather, hot summer weather, and cold rainy weather (this year). You just never know what to expect when you camp in October. 

Now for your viewing pleasure, I have pulled together some pictures from past Halloween Camping trips. We looked so young all the way back in 2007!

2013:

2012:


2011:


2010:

2007:


Well, there ya have it, our fun October tradition!
Do you have any nontraditional traditions that you would never think to miss out on? I'd love to hear about them!


Saturday, October 19, 2013

Wooden Pumpkins


I have been seriously off my crafting game lately! School, and life in general is getting busier every day and I'm sad to say crafting has moved down on the priority totem pole. Well, this weekend I needed a break from all the school work, so I sent hubby outside to cut some 2x4's that I could make into pumpkins. 

what you'll need:
2x4 piece of wood, paint (i used orange and brown), sand paper, scrapbook paper, mod podge, hot glue gun, ribbons/wire or whatever you would like to decorate the stem

FIRST: Cut the wood.
Tall Pumpkin- 7- 8inch pieces
Short Pumpkin- 5-10in pieces
For each pumpkin, 2 pieces of wood should have 30 degree cuts on each side. These pieces will be the top and bottom pieces of your pumpkin and will make the pretty curve that gives it a rounder look.


SECOND: Paint the wood, mostly just around the edges. I started painting the whole thing, and then realized when I was almost done that nobody was going to see the tops and bottoms once I glued them together. Oops!


THIRD: Sand the edges of each piece to give your pumpkins a weathered look.

FOURTH: Apply scrapbook paper of your choosing to the front of each piece of wood using mod podge. This process is similar to making wood block letters.

FIFTH: Hot glue all the pieces together and decorate your stem!


Happy Crafting!


Wednesday, October 31, 2012

Happy Halloween!


We hope everyone is enjoying their Halloween night!
We decorated the house, put on our costumes, and waited for all the trick-or-treaters to come, and by all I mean thirteen of them. Needless to say, the rest of our night will be spent drinking Witches Brew, eating the leftover candy, and watching Hocus Pocus. 


Friday, October 26, 2012

Tutorial: BOO Sign


Here is my BOO sign that has been hanging on my front door for most of October. I have been wanting to post this for quite some time now, but then life happened, so I am just now getting around to it, but I am really happy with the way it turned out! 

What you will need:
Wooden Letters (I got mine at Hobby Lobby)
Scrapbook Paper
Mod Podge
Ribbon
Scissors
Paint

Start by tracing your letters onto the back of your scrapbook paper and cutting them out.
(and remember to trace the letters backwards too!)


Once your letters are traced, you may choose to paint your letters. I do this to cover the edges and make sure no wood will be visible.


Then comes the Mod Podge. First, put a thin layer directly onto the letters and place the scrapbook paper on top. Once that is completely dry, add a coat of mod podge over the scrapbook paper. You may choose to stop there, but I usually add one more layer just to be safe. 


When everything is completely dry, connect the letters with ribbon and add a loop to the top for hanging. Then all that's left to do is display your creation!


(yes, I know my front porch is looking pretty sad, but check out that cute pumpkin tin!)


Sunday, October 7, 2012

Pumpkin Decorating Ideas

If you are sick of carving pumpkins, this post is for you! Here are ten different ways to decorate pumpkins, without digging out the guts. Enjoy!

1. Glitter 
Apply glue to your pumpkin, let dry 30 seconds and sprinkle with glitter.


2. Buttons 
Glue buttons onto your pumpkin. Cover it, write a word, or create a silly face.


Simply glue rhinestones to your pumpkin any way you'd like.


Make your pumpkin into a chalkboard for an endless drawing board.


5. Wire
Make words, spirals, or wrap your pumpkin up with some wire.


A different way to carve your pumpkin to get a whole new look.


7. Lace
Wrap your pumpkin in lace for an elegant look.


Cover your pumpkin in thumb tacks. Use metallic spray paint to finish it off.


Use cheesecloth to mummify your pumpkin, then just add eyes.


Personalize your pumpkin with your monogram. Or paint your house number on one for your front porch.


Be sure to check out my other Fall posts: