Showing posts with label pumpkins. Show all posts

Wednesday, October 14, 2015

Fall Home Tour: 2015


I am so excited to be sharing my neutral fall living room with you today. 

About a month ago, I decided to start decorating with more neutral colors. I set out to make a few small changes. Little by little I started adding neutrals into the room. I bought new pillows and I put up these wood floating shelves and before I knew it, this neutral living room came to life!
But I couldn't give up every bit of color in this room, so we decided on a blue entertainment center just to keep things interesting.

I tried to keep my neutral living room ideas in mind when decorating for fall, and I'd like to this it was a success!


Lucky me, I scored these adorable gold and white acorns in the dollar spot at Target this year, along with the burlap runners!


What do you think of the neutral decor? 
It's a little different than my normal decorating style, but I gotta say I am loving this new look so, so much!

Want to see more?
Check out last year's Fall Home Tour here.
OR
You can view my Three Year Home Tour here.


Saturday, October 19, 2013

Wooden Pumpkins


I have been seriously off my crafting game lately! School, and life in general is getting busier every day and I'm sad to say crafting has moved down on the priority totem pole. Well, this weekend I needed a break from all the school work, so I sent hubby outside to cut some 2x4's that I could make into pumpkins. 

what you'll need:
2x4 piece of wood, paint (i used orange and brown), sand paper, scrapbook paper, mod podge, hot glue gun, ribbons/wire or whatever you would like to decorate the stem

FIRST: Cut the wood.
Tall Pumpkin- 7- 8inch pieces
Short Pumpkin- 5-10in pieces
For each pumpkin, 2 pieces of wood should have 30 degree cuts on each side. These pieces will be the top and bottom pieces of your pumpkin and will make the pretty curve that gives it a rounder look.


SECOND: Paint the wood, mostly just around the edges. I started painting the whole thing, and then realized when I was almost done that nobody was going to see the tops and bottoms once I glued them together. Oops!


THIRD: Sand the edges of each piece to give your pumpkins a weathered look.

FOURTH: Apply scrapbook paper of your choosing to the front of each piece of wood using mod podge. This process is similar to making wood block letters.

FIFTH: Hot glue all the pieces together and decorate your stem!


Happy Crafting!


Sunday, October 7, 2012

Pumpkin Decorating Ideas

If you are sick of carving pumpkins, this post is for you! Here are ten different ways to decorate pumpkins, without digging out the guts. Enjoy!

1. Glitter 
Apply glue to your pumpkin, let dry 30 seconds and sprinkle with glitter.


2. Buttons 
Glue buttons onto your pumpkin. Cover it, write a word, or create a silly face.


Simply glue rhinestones to your pumpkin any way you'd like.


Make your pumpkin into a chalkboard for an endless drawing board.


5. Wire
Make words, spirals, or wrap your pumpkin up with some wire.


A different way to carve your pumpkin to get a whole new look.


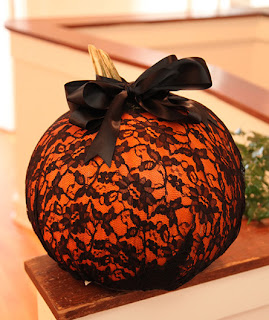
7. Lace
Wrap your pumpkin in lace for an elegant look.


Cover your pumpkin in thumb tacks. Use metallic spray paint to finish it off.


Use cheesecloth to mummify your pumpkin, then just add eyes.


Personalize your pumpkin with your monogram. Or paint your house number on one for your front porch.


Be sure to check out my other Fall posts: