Showing posts with label makeover. Show all posts

Tuesday, July 29, 2014

Home Office Details

Thank you so much for the sweet comments on my home office reveal last week. 

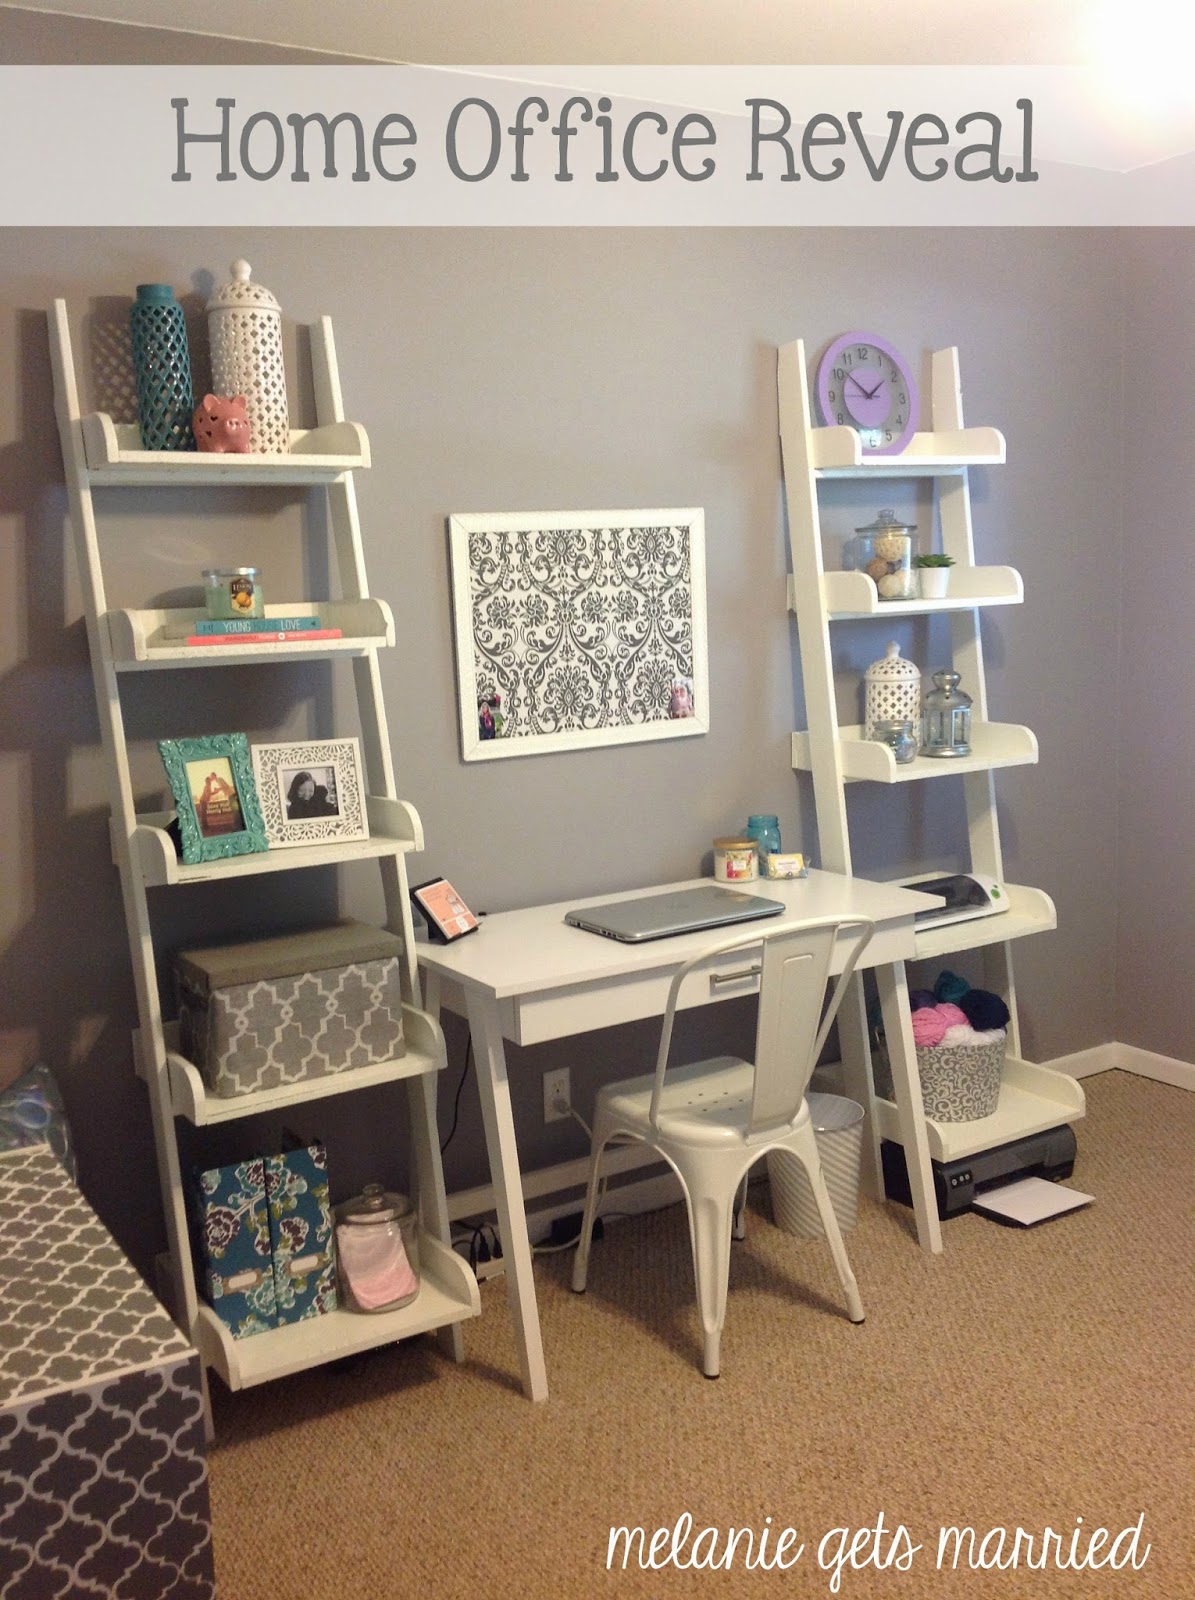
Today I am going to share with you all the details and where you can purchase most things. I'll also be giving the approximate cost of the things I purchased specifically for this makeover.


Paint Color: Tin Man by Pratt & Lambert... $30

Desk: Target, Threshold Basic Desk... $90

Chair: Meijer... $20

Ladder Shelves: built ourselves, similar to Ana White's Leaning Bookshevles building plan... $50

Grey Storage Bins: TJ Maxx... $30


Ceramics: TJ Maxx, Marshalls, Home Goods... $40

Frames: TJ Maxx/Marshalls... $15


Clock: Target, spray painted to match the room

Glass Canisters: Target

Mason Jars: Meijer

Washi Tape: Dollar Tree

Lantern: Ikea... $4


Wall Collage Frames: Ikea (check out the full details here)... $25

Cabinet: previously owned (check out the stenciled makeover here)

Pillows: Marshalls... $20


Antique Sewing Cabinet: Gift from Adam's Grandma, but the transformation cost... $30 (check out the transformation here)


Fabric Covered Bulletin Board: (check out the details here) Fabric from Hobby Lobby... $5

Grand Total: $359

That's right! A whole room makeover for only $350. Now it's your turn!

If I've missed something and you are just dying to know where I got it, let me know and I'd be happy to share. 


Wednesday, July 23, 2014

Home Office Reveal


Today I am finally revealing my home office, and I am so excited to be showing it off. I think this room goes down in history as my favorite room makeover yet! 

If you've been following along for a while, you may have noticed that I have never showed you what my office looks like. Mostly because it usually looked something like this...


Kidding... sort of. This picture is from when we first moved in and had just gotten married. It was always the dumping grounds for all our junk. While I'm happy to say it didn't look like this for too long, it always was kind of our catch-all room. 


Now that you've taken a look at the room, you may have noticed that this room has been in the making for a while. I've been showing you bits and pieces little by little (stenciled cabinet, sewing machine, bulletin board, wall collage). Well, now I'm finally showing you the finished almost finished product.

 We painted the room right after Christmas and purchased the desk shortly after. Adam built me these wonderful ladder shelves and I absolutely love them. The look is exactly what I was going for. I love how clean and white everything is! 

I wanted the shelves to be something functional, yet stylish and I really think I pulled it off. With the help of some mason jars, glass canisters from target, and these grey storage bins I found at TJ Maxx, I am able to store a lot of things I need that are not necessarily pretty. 

Alright, alright. Enough chatter. I'll let the pictures do the talking.


While this is the big reveal, there are still quite a few things I want to do in this room. First things first I really want to find a chair to stick in the corner. I also want to make some curtains and have big dreams of turning the closet into a craft area. A girl can dream right?

What are some essentials for your home office?
Which room in your home is your favorite?

Happy Hump Day!


Epic Mommy Adventures

Wednesday, November 6, 2013

Ceiling Fan Makeover


Our home has no air conditioning, so in the summertime, ceiling fans are an absolute MUST. Ceiling fans are ugly enough as it is, but the brass and wood ones we got stuck with were hideous! I was looking for a quick, easy and best of all, cheap, project to do last weekend. I thought to myself, why not try to paint these fans to improve the look of our bedrooms? This seemed to be much more financially responsible that buying brand new ones, so I went with it.

I had the hubs do all the dirty work and take apart each light and fan combo. I cleaned all the dust off of each piece, and then the painting began. I used Rustoleum's Oil Rubbed Bronze Paint on all the brass, and painted the fan blades using some paint I had left over from my Stenciled Cabinet project.  

Here is the ugly, drab ceiling fan I started with:

And the final product:

The grey matches the room perfectly, and I am so happy with the final result! it took hardly any time at all to complete and only cost me the $5 for the can of spray paint.


It is such a small change to our master bedroom, but it was so worth it to get rid of that ugly brass. 
Next step in improving the master bedroom: white trim!

What do you think? Does anyone else have old brass fans in their bedrooms? Does it bother you as well or am I just a bit neurotic? 

What are some other quick and easy projects that have made a difference in the look of your home? I would love to hear about them and maybe complete a few of them myself!

Happy Hump Day!